 DigiUsher Documentation
Connecting an Oracle Cloud Infrastructure (OCI) account
Overview
To connect your OCI environment to DigiUsher, you create an IAM user. This user needs read-only access to your cost, usage, resource, and metrics data. This page gives the permissions, the reason for each permission, and the credentials that you enter in DigiUsher.
OCI supports FOCUS, the open standard of the FinOps Foundation for billing data. DigiUsher reads the Cost and Usage Reports from the FOCUS Cost Report Schema.
Summary of Access Required
| Component | Details |
|---|---|
| Identity | OCI IAM user (digiusher-service-user). It uses the API only, and it has no Console password |
| Authentication | API key pair: a PEM private key and a fingerprint |
| Access level | Read-only. Every policy uses the verb read only |
| Scope | Tenancy-wide |
| Billing | Read-only access to cost and usage reports |
| Data access | The Cost and Usage Reports in the cross-tenancy bucket of Oracle, in the FOCUS format only |
| Capability | What It Provides |
|---|---|
| Billing data | Cost analytics, chargeback and showback, budgeting, forecasting, anomaly detection |
| Resource inventory | Asset discovery, idle resource detection, tag-based cost allocation |
| Optimization recommendations | Rightsizing, commitment analysis, idle resource cleanup |
| Utilization metrics | CPU, memory, network, disk usage for rightsizing analysis |
DigiUsher cannot create, change, or delete an OCI resource.
Manual setup only
DigiUsher has no Terraform automation and no OCI Resource Manager automation for OCI. Use the OCI Console steps on this page to give the access.
Prerequisites
Information to Gather
| Item | How to Find |
|---|---|
| Tenancy OCID | OCI Console > Administration > Tenancy Details |
| Home Region | For example us-ashburn-1. Tenancy Details gives the value. |
Roles Required by the Person Performing Setup
| Role | Why |
|---|---|
| Tenancy Administrator | To create IAM users, groups, and policies |
Network & Email Access (For Regulated Environments)
If your organization restricts outbound internet access or email domains, make sure that these two items are in place before you start:
- Domain allowlist. Add
*.digiusher.comto the allowlist of your network and your firewall. The users of your organization can then open the DigiUsher platform in their browsers. - Email allowlist. Add
digiusher.comas a permitted sender domain in your email security gateway. DigiUsher sends onboarding confirmations, alerts, and reports from@digiusher.comaddresses.
Setup
Do these steps in the OCI Console. They create the IAM group, the user, the policies, and the API key that DigiUsher uses.
Create IAM Group
- Go to OCI Console > Identity > Domains.
- Select the Default domain.
- Go to User Management > Groups.
- Click Create Group.
- Enter
digiusher-finops-groupas the Name, andDigiUsher FinOps platform - read-only access for cost analytics and optimizationas the Description.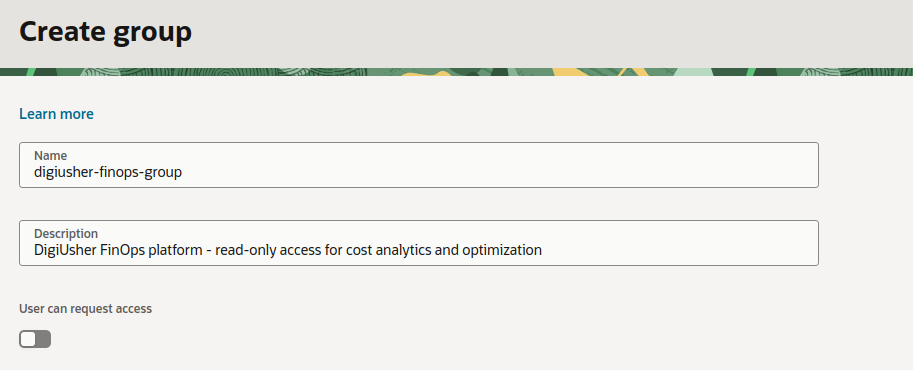
- Click Create.
Create IAM User
- Go to OCI Console > Identity > Domains.
- Select the Default domain.
- Go to User Management > Users and click Create.
- Enter
digiusher-service-useras the Name, andService user for DigiUsher FinOps platformas the Description. OCI also needs an Email, for exampledigiusher-svc-oci@YOUR_COMPANY_NAME.com. - Add the user to the group
digiusher-finops-groupfrom the step before.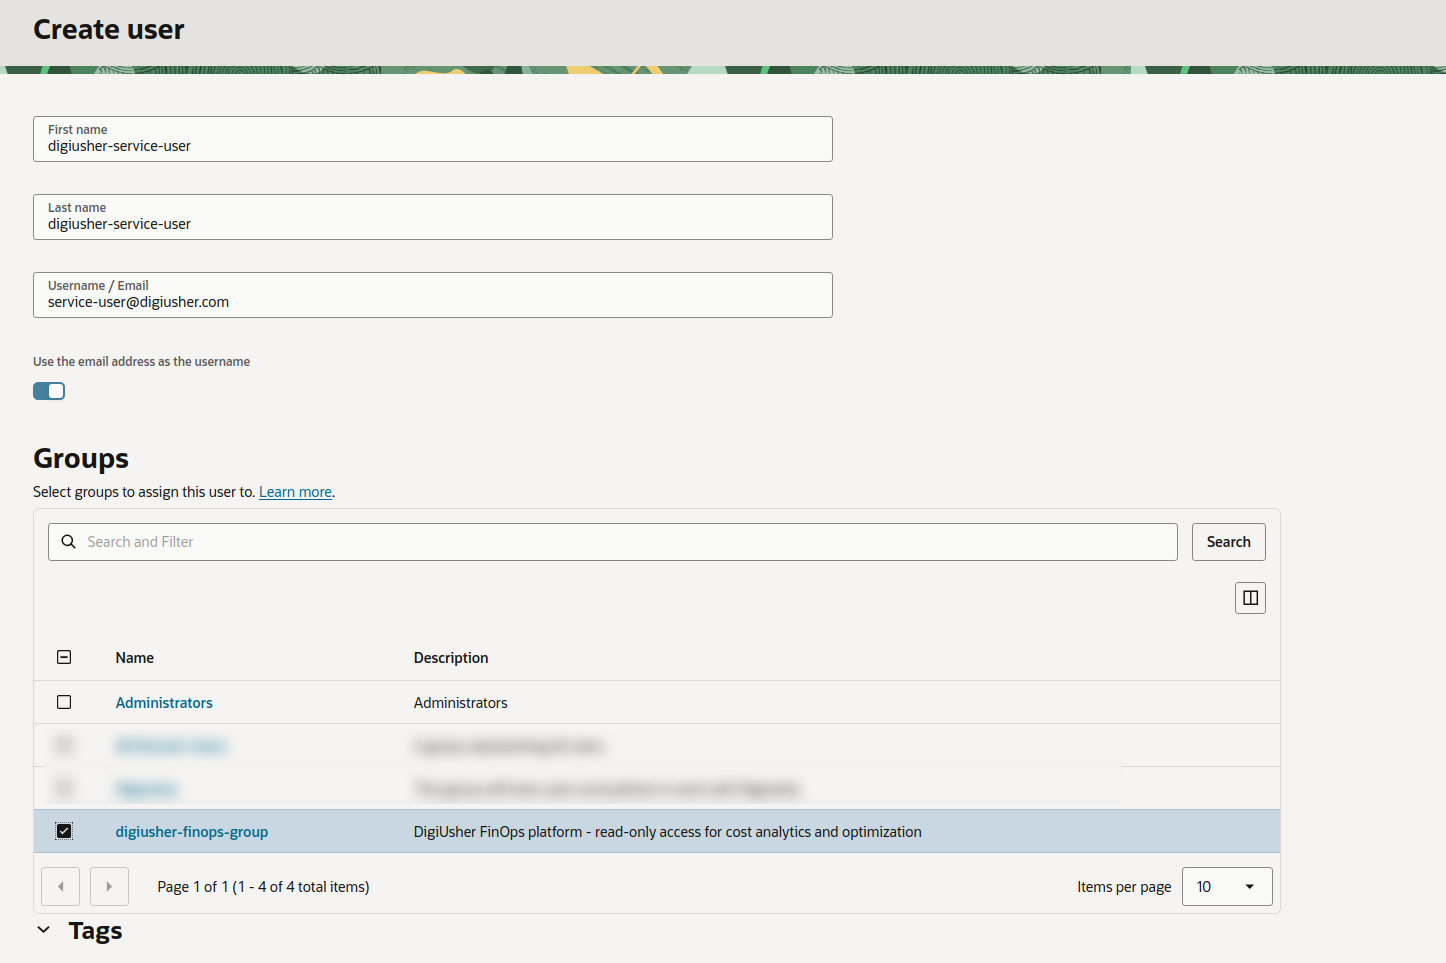
- Click Create.
Create IAM Policies
Create these two policies under Identity > Policies > Create Policy.
For each policy, set the Compartment to your root compartment, at the level of the tenancy.
OCI needs the define statement and the endorse statement in a different policy from the Allow statements. Create these two policies at the level of the tenancy, which is the root compartment.
Policy 1: Cost Report Cross-Tenancy Access
This policy gives read access to the cost reporting tenancy of Oracle, for the FOCUS cost reports. The OCID in the statement is the cost reporting tenancy of Oracle. It is the same for every OCI customer.
define tenancy usage-report as ocid1.tenancy.oc1..aaaaaaaaned4fkpkisbwjlr56u7cj63lf3wffbilvqknstgtvzub7vhqkggq
endorse group digiusher-finops-group to read objects in tenancy usage-report
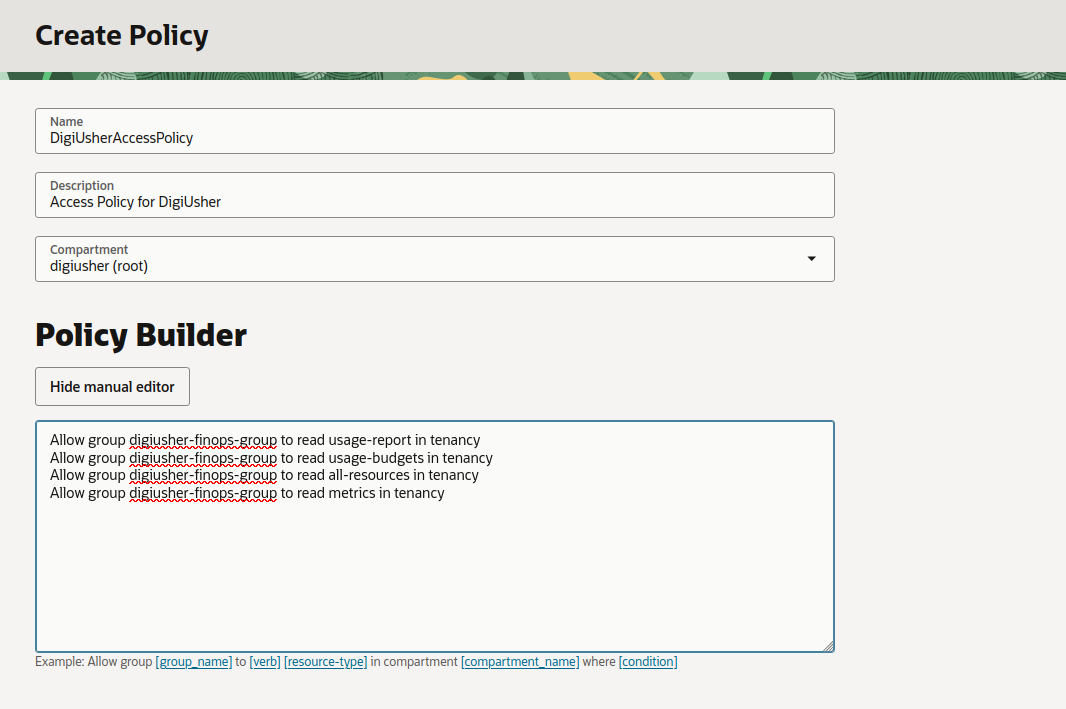
Policy 2: DigiUsher Access Policy
This policy gives read access to the usage reports, the budget data, the resource metadata, and the monitoring metrics.
Allow group digiusher-finops-group to read usage-report in tenancy
Allow group digiusher-finops-group to read usage-budgets in tenancy
Allow group digiusher-finops-group to read all-resources in tenancy
Allow group digiusher-finops-group to read metrics in tenancy
All policies are read-only. DigiUsher cannot create, change, or delete anything in your environment.
Note
If you remove the last two statements, all-resources and metrics, DigiUsher gives no optimization recommendations, no rightsizing recommendations, and no data from the utilization metrics.
Create each policy in the OCI Console as follows:
- Click Create Policy.
- Enter the name and the description.
- Set the compartment to root.
- Change to the manual editor and enter the policy statements.
Generate API Key
- Go to OCI Console > Identity > Users.
- Click
digiusher-service-user, or the name that you configured.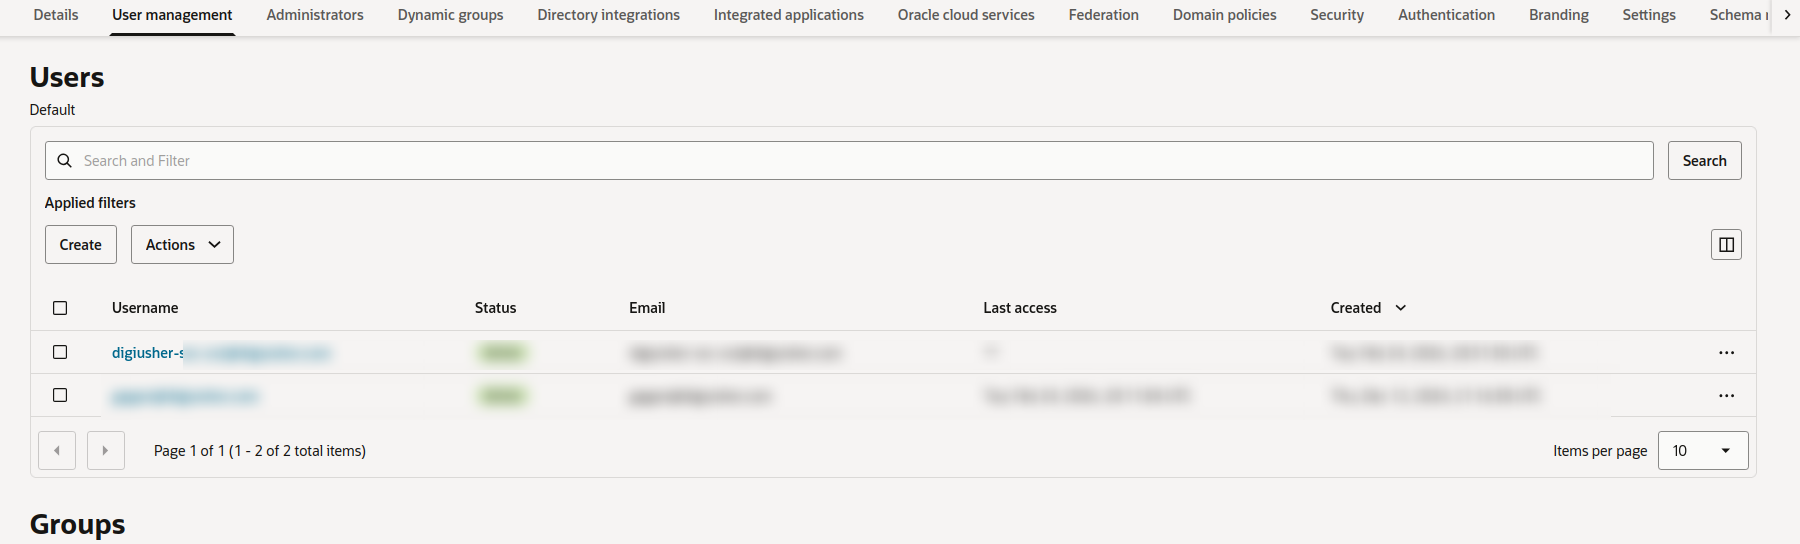
- Under Resources, click API Keys.

- Click Add API Key.
- Select Generate API Key Pair.
- Click Download Private Key and save the
.pemfile in a safe place.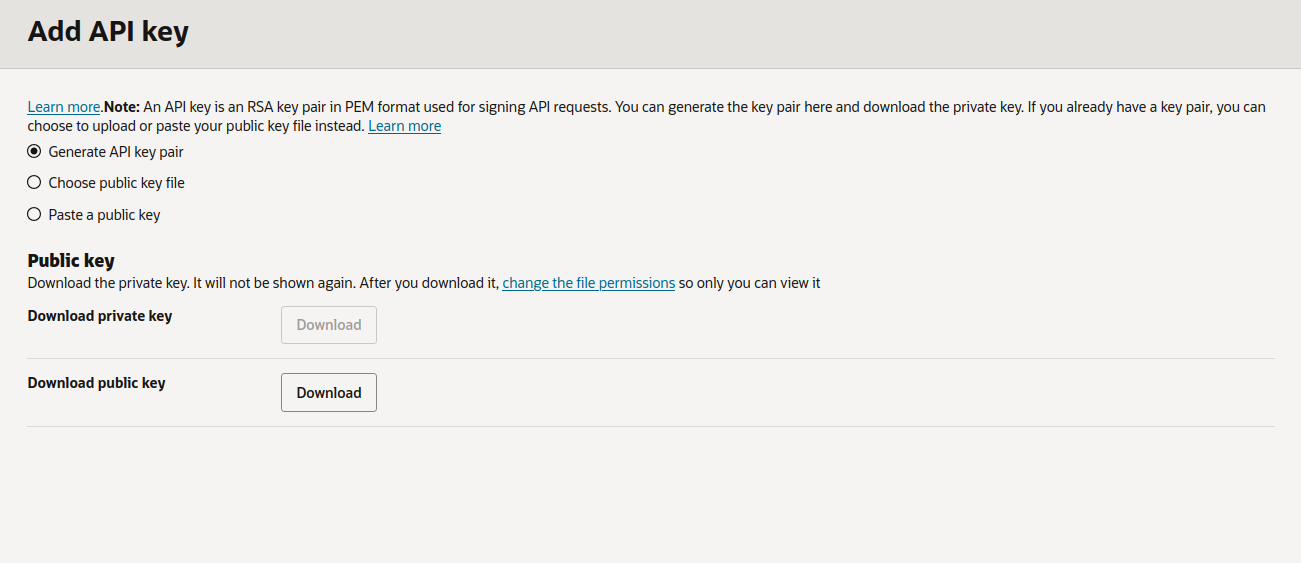
- Click Add.
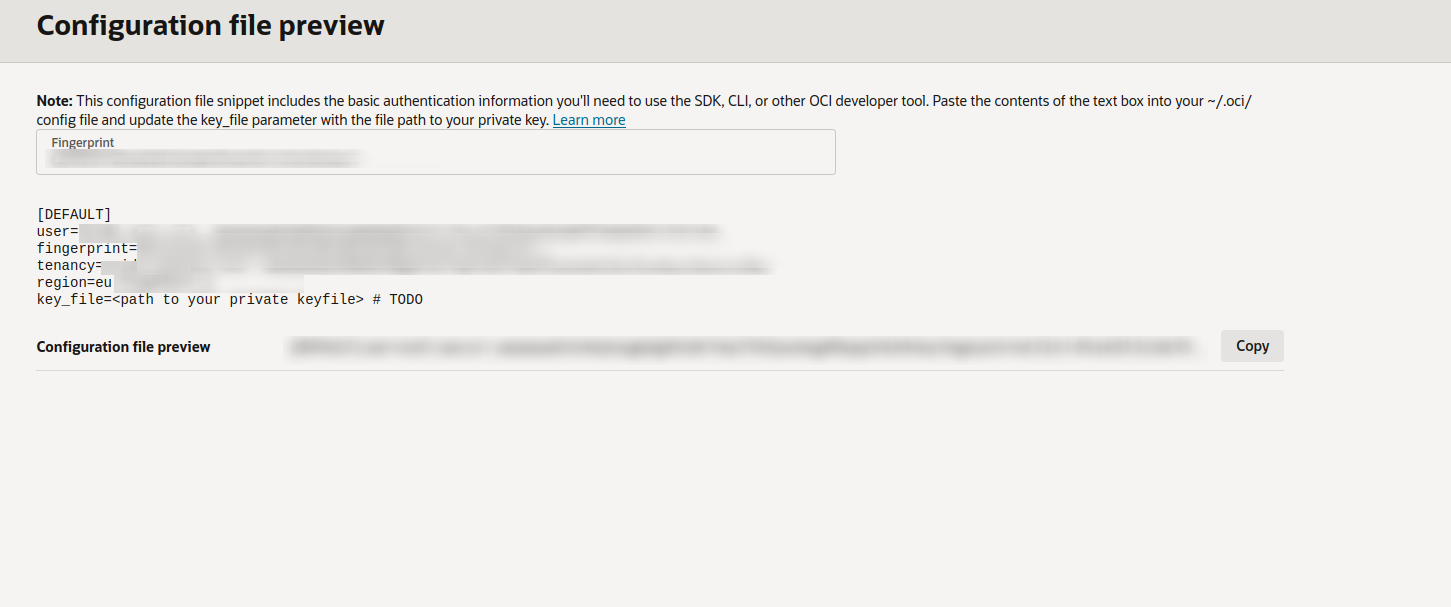
- OCI shows a Configuration File Preview with the user OCID, the fingerprint, the tenancy OCID, and the region. Click the copy button and save these values.
Important
CAUTION: Save the private key file before you leave the page. OCI shows the private key one time only.
Connect in DigiUsher
After you complete these steps, go to Connectors > Add Source and select Oracle Cloud Infrastructure. On the Configure step, enter the values in the table, then click Review. On the Connect step, click Connect source.
| Field | Where to Find |
|---|---|
| Display Name | Any label you prefer (for example OCI Production) |
| Tenancy OCID | Administration > Tenancy Details |
| User OCID | Identity & Security > Users > digiusher-service-user |
| Fingerprint | The Configuration File Preview gives this value after you add the API key |
| Private Key (PEM) | Upload the private key file that you downloaded (.pem or .key) |
| Region | Your home region, for example us-ashburn-1. Tenancy Details gives the value. |
| Compartment OCID (optional) | Leave empty to read the whole tenancy, or enter a value to read one compartment only |
Setup Checklist
- IAM group
digiusher-finops-groupcreated - IAM user
digiusher-service-usercreated and added to the group - Policy 1: cost report cross-tenancy endorse created
- Policy 2: DigiUsher access policy created
- API key added to the user and the private key file saved
- All required credential values entered into the DigiUsher platform
-
*.digiusher.comin the allowlist of the network and the firewall (if your organization restricts this) -
digiusher.comin the allowlist for incoming email (if your organization restricts this)
Security
What DigiUsher CAN Access (Read-Only)
- The Cost and Usage Reports in the FOCUS format, in the cross-tenancy bucket of Oracle
- The budget data
- The resource metadata, such as names, types, regions, and tags, through the Resource Search API
- The utilization metrics for CPU, memory, network, and disk, in OCI Monitoring
- The hierarchy of the organization and the compartments
What DigiUsher CANNOT Do
- Create, change, or delete an OCI resource
- Read application data, databases, or the content of your storage
- Change an IAM policy or a permission
- Read secrets, credentials, or encryption keys
- Read network traffic or the content of your logs
- Buy a product or change the billing configuration
Monitoring
To monitor the activity of the service user, open OCI Console > Identity & Security > Audit and filter by the user digiusher-service-user.
Credential Rotation
Go to Identity & Security > Users > digiusher-service-user > API Keys > Add API Key and create a new key pair. Then delete the old key. Upload the new private key to the data source in DigiUsher and enter the new fingerprint.
Revocation
Delete the user digiusher-service-user in Identity & Security > Users. OCI then immediately invalidates the API key and the group membership. Then remove the digiusher-* policies.
Troubleshooting
"Authorization failed" when creating policies
You need the access of a tenancy administrator. Make sure that you sign in as an administrator, or that you have the manage permission on users, groups, and policies.
"Policy statement is invalid"
The cross-tenancy endorse statement and define statement must be in a different policy from the Allow statements. Make sure that the statements of Policy 1 are not in Policy 2.
DigiUsher reports "Unable to access cost reports"
- Make sure that the
endorsepolicy exists under Identity & Security > Policies. - Make sure that the fingerprint of the API key matches the fingerprint in DigiUsher.
- Make sure that you uploaded the complete private key file from OCI. The file must contain the
-----BEGINline and the-----ENDline. - For a new tenancy, the cost reports can take up to 24 hours to appear.
Memory metrics not available
Memory metrics need the Oracle Cloud Agent on your instances, with the Compute Instance Monitoring plugin enabled. Most platform images enable this plugin by default. On a custom image, you must enable it by hand.
Need Help?
If this page does not answer your question, write to DigiUsher support at support@digiusher.com. The team will help you.